Table of Contents
Introduction
Welcome, fellow photographers! If you are looking for one of the most rewarding and visually stunning challenges in Bangkok photography, look no further than the magnificent Rama VIII Bridge.
This bridge is more than just a transportation link. Instead, it is a piece of modern architecture perfectly positioned against the historic backdrop of Rattanakosin (Bangkok Old Town) on the east side of the Chao Phraya River. This post is your essential guide to a 4 km photo walk around and over the bridge. Furthermore, it hits every key photography viewpoint for both day and, crucially, night-time magic
For those who just want the visual guide, go straight to the map.
Rama VIII Bridge: A Modern Icon
Before you start walking, it’s worth appreciating the unique structure you’re about to capture.
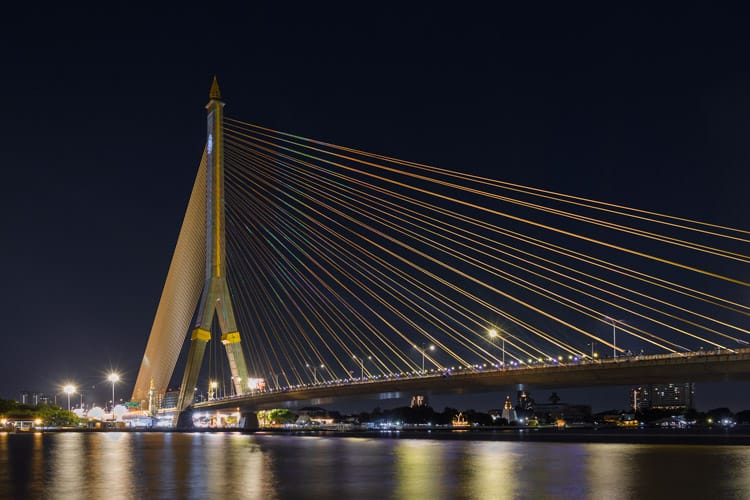
The Rama VIII Bridge was constructed between 1999 and 2002 as a royal project to alleviate traffic congestion on the nearby Phra Pinklao Bridge. Named in honour of the late King Ananda Mahidol (Rama VIII), the bridge features a striking asymmetrical cable-stayed design. This has a single, inverted Y-shaped pylon standing 160 meters tall on the Thonburi side. At the time of its completion, it was one of the world’s largest asymmetrical bridges of its kind.
This one-of-a-kind structure, with its golden-hued cables stretching dramatically across the Chao Phraya River, makes it a magnet for photographers. Those hunting for powerful long exposure photography shots and compelling cityscapes will not be disappointed.
Ready to explore? Grab your camera, check your tripod, and let’s find the very best viewpoints to capture that iconic Rama VIII Bridge photograph!
How to: Long Exposure Photography
Summary of steps in taking a long exposure photograph. For more details, see Long Exposure Photography: a Step-by-Step Guide.
- Focus
Auto focus picture and compose then switch off autofocus to lock the focus.
- Exposure
In Av mode set ISO 100 and the required aperture. Take a test shot and note the exposure time. Switch to Manual mode and apply the exposure settings from the test shot.
- Increasing the exposure time: ND Filter
Use a phone app like NiSi Runner or an ND filter data table to estimate the ND filter needed to give the required exposure time.
- Taking the photo
Attach the required ND filter and take the photo.
Directions
This circular Rama VIII Bridge walk starts and ends at Phra Arthit Pier and could be followed in either direction. However, the map numbers the viewpoints for a clockwise route. Alternatively, you might use the map to visit only specific locations.
The map legend contains separate layers for the Rama VIII Bridge viewpoints 📷 and navigation waypoints. Both layers include thumbnail images at each location, but you can also view full resolution images of the Rama VIII Bridge taken from each bridge viewpoint. The layer markers can be switched on and off using the tick boxes.
Moreover, my Detailed Guide provides extra information for following the route. This should be helpful because the route involves some small, hidden alleyways.
Rama VIII Bridge: Where to Eat
There are two restaurants close by which offer contrasting experiences.
Coco Chao Phraya provides sweeping river views and a modern setting to help you relax. In contrast, May Kaidee’s Green Garden offers a tranquil, shaded oasis with a focus on healthy vegetarian cuisine. You might choose Coco if you want the cooling riverside breeze and great scenery. However, the Green Garden is perfect if you prefer a quiet escape from the city noise. Ultimately, both locations sit conveniently on the route to provide a perfect end to your photography journey.
Map
The following map shows the entire route, with highlights and reference points to help you stay on track.
To view the map legend or follow the route in Google Maps, tap these icons in the map header.
View the map legend.
Follow the route in Google Maps.
Detailed Guide
For comprehensive directions and additional information, click ‘Detailed Guide’ below.
Rama VIII Bridge
Send download link to:
Wrapping Up
Ultimately, the Rama VIII Bridge is one of the most rewarding spots in Bangkok for any photographer. I hope this guide helps you navigate the hidden alleys and find the best viewpoints easily. Additionally, remember to stay for the blue hour when the golden cables might glow against the sky. Now it is your turn to grab your tripod and explore. Furthermore, if you wish, please share your favorite shots with me. Happy shooting!
As always, if you find any errors in this post, I would be very grateful if you would reach out to me. You can drop a comment below, use the contact form, or email me at derek@lens-wanderings.com.
Best wishes
Derek
Rama VIII Bridge FAQ
If you just walk straight around without taking any photographs, it will probably take between one and two hours. However, obviously, with taking photographs you could easily add on another one or two hours.
I have marked eight viewpoints on the map.
This depends on what you’re looking for. If you want close-ups of the architecture and structure, try shooting on the bridge itself. For a panoramic view of the entire bridge, viewpoints 7 and 8 are probably the best. Viewpoint 8 also offers a view of the unique inverted Y structure of the support pillar, which is not visible from viewpoint 7 or the Somdet Phra Pinklao Bridge (viewpoint 1). To view the bridge with some interesting foreground, try viewpoint 2 down Somdet Phra Pinklao 2 Alley, viewpoint 3, in Wat Phraya Siri Aisawan, or viewpoint 4 in Suan Luang Rama VIII Park
Yes, definitely. The walk itself has a lot of variation and beautiful views over the river and bridges. A mobile phone camera will give you some wonderful images.
Click on the legend icon on the map and then deselect everything except the Rama VIII Bridge Viewpoints which are coloured black.
Click on a black viewpoint marker on the map. This will show a thumbnail image taken from that point.
Leave a Reply